Finally started putting stuff on Etsy again. I'm finishing up a bunch of projects tonight and will add them as soon as they are done. But for now, I guess this is my mini-launch of the new store. Buy things! Tell friends!

Monday, February 7, 2011

Friday, February 4, 2011
Upcycled Book Journal
I finally found a tiny book to turn into a pocket sized journal. 50 cent project? Yes please! Here's how:
Gather all your supplies. Book, mod podge, pant brush, embroidery floss, needles, ruler, scissors, awl, plain paper, printed paper, and self healing mat.

First you need to get rid of the pages in the book. This book was well loved, so they came out easily.
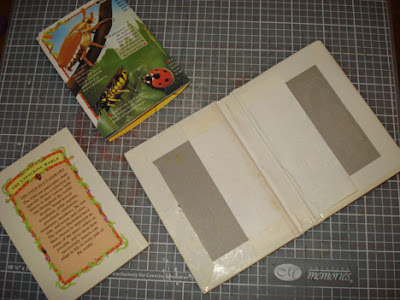
Mod Podge some pretty paper over the now ugly inside cover of the book.

Cut desired amount of paper into the correct size for your book.

Fold a few sheets of paper at a time in half to create your signatures. (Signatures are sectioned paper. I folded 4 sheets together to create 8 pages. If you folded 20 pieces at once, you'd have a wonky book!) Then use an awl to punch holes along the crease.

Make a template and use it on each of your signatures so the holes on each page are identical. This is important later. Once you've got all your signatures, sew them up!

Now you've got to sew all the signatures together. Basically, you just zig zag between the thread around your holes and pull it tight!

Punch holes in the spine of your book. I honestly just winged this part because I usually cut the spine off. The thought was to sew through the signatures again, snug against the sections I just did (the black part), and then sew through the spine. It worked, but the process was a little weird (and impossible to photograph) and I'll probably do it differently next time.


Gather all your supplies. Book, mod podge, pant brush, embroidery floss, needles, ruler, scissors, awl, plain paper, printed paper, and self healing mat.
First you need to get rid of the pages in the book. This book was well loved, so they came out easily.

Mod Podge some pretty paper over the now ugly inside cover of the book.

Cut desired amount of paper into the correct size for your book.
Fold a few sheets of paper at a time in half to create your signatures. (Signatures are sectioned paper. I folded 4 sheets together to create 8 pages. If you folded 20 pieces at once, you'd have a wonky book!) Then use an awl to punch holes along the crease.

Make a template and use it on each of your signatures so the holes on each page are identical. This is important later. Once you've got all your signatures, sew them up!

Now you've got to sew all the signatures together. Basically, you just zig zag between the thread around your holes and pull it tight!
Punch holes in the spine of your book. I honestly just winged this part because I usually cut the spine off. The thought was to sew through the signatures again, snug against the sections I just did (the black part), and then sew through the spine. It worked, but the process was a little weird (and impossible to photograph) and I'll probably do it differently next time.

Ta-da! Finished book. There are a lot of pages in there!


Wednesday, February 2, 2011
Projects at Work
At job #1 I wear many hats. Studio Specialist, Museum Educator, Exhibits Personnel, Performer, Fabricator. Simply put, I do a lot. Yesterday and today were no exception. I've been busy creating backdrops for our Theater stage. Currently, its a terrifying, dimly lit, black room with a few costumes on a rack. Its intention is for kids to be inspired to put on a play and have fun. I can't imagine anyone ever doing that in the current space. So I've taken it upon myself to create three or four backdrops that can be pulled out at will and used to liven up the space. I just got my fabric in the mail yesterday and started sewing. Let me go ahead and point out that a standard, personal sewing machine is not intended for sewing together 15 yards of heavy canvas. I didn't really think about that when planning this project.
 So, like I said, I had 15 yards of heavy canvas to work with. The widest canvas you can buy is 60", but the backdrop I'm working on needed to be 10' x 19'. Which means sewing together two panels of 19' long canvas along one edge. This required some help, but my lovely assistant managed to snap a few photos while I was working. Apparently I always make a funny face when sewing... at least, I did while working on this.

 I took over the whole office with this mess! It still needs to be hemmed, but I needed to give my poor machine a rest before I do that. The thing nearly overheated because the canvas was waaaay too heavy for the feed dogs to do anything with! Oh well, tomorrow is another day. After it is all hemmed, I'll project an image I drew onto the canvas to trace out, then kids will get to help me paint it! I'm pretty excited about the whole process.
Today, on the other hand, I worked in the shop all day. Cutting and nailing and stapling and epoxying. I was asked to make paper making screens and frames for use in after school classes. They actually turned out quite well for the most part, and next I'll be making them for use in the studio since the ones we have are very, very worn.
New frames:


 Ready for pulp!

Today, on the other hand, I worked in the shop all day. Cutting and nailing and stapling and epoxying. I was asked to make paper making screens and frames for use in after school classes. They actually turned out quite well for the most part, and next I'll be making them for use in the studio since the ones we have are very, very worn.
New frames:
New screens:
Used together:

Tuesday, February 1, 2011
Charms
After talking to Adam last night and today about cool charms and where to find them, I remembered I can make my own!
Just draw whatever you'd like on Shrinky Dink plastic and cut it out as best you can,


Just draw whatever you'd like on Shrinky Dink plastic and cut it out as best you can,
Bake it in the over for a few minutes,
And let it cool!

Punch holes BEFORE you bake it though, or you'll be kicking yourself later. Now I just need to make some things to add these to!
Monday, January 31, 2011
Heart Brooch and Candy Molds!
For another gift, I made this felt brooch. I plan on making a bunch of these since they are simple but so stinkin' cute.
 Just felt stitched together with a pin on the back.
Cute packaging doesn't hurt, either.
 I also made a bunch of candy to give to all the January birthday ladies!
 Being the super genius that I am, I remembered to take pictures of everything except the finished product. So for now I'll leave you with just the teaser pic of all my chocolate molds! I'll definitely be making more within the week, so I'll make sure to get pictures of those!
Cute packaging doesn't hurt, either.

Sunday, January 30, 2011
Birthday Gifts!
For my Mammaw's birthday I made her a couple of things. I made the bowl this past summer at the camp where I teach. I had intended to give it to her for Christmas but ended up making her a few other things instead.
 I was really pleased with how to glaze turned out. It barely ran at all during firing, which was awesome because our kilns were crazy.
The big part of her gift was this pillow. Years and years and years ago, Mammaw made a quilt. We had it when I was little, and I remember studying it because of all the stitching, the different fabric patterns, everything. You could tell it wasn't from the store, and that's why I liked it. I moved away to college and kept thinking about this quilt. I wanted to take it to the park when I would go on picnics. Eventually I ended up just taking it from my parents house because I knew it was just sitting in the closet. I love this quilt. Then a couple of summers ago, Mammaw gave me a foot stool that doubled as a sewing box. She had it in the garage for a while, and thought that maybe I'd like it. Of course I did. I opened it up, and low and behold, there were some unused pieces from the quilt! They were already pieced together, you could tell it was just a portion that had been trimmed during the final construction. There were two full squares, one that I'll use for myself, and this one which I used for hers.
 I trimmed it as little as possible, and framed it out in some coordinating fabrics that I had on hand.
 The fabric I used on the corners is so similar to the original print in the middle, but its not exact. I'm still amazed I had something that close on hand. For the back, I used some fabric from my Aunt Dolores that happened to be the same color scheme. Old fabric is seriously one of my favorite things.


Now I can't wait to make an almost matching one for myself!
The big part of her gift was this pillow. Years and years and years ago, Mammaw made a quilt. We had it when I was little, and I remember studying it because of all the stitching, the different fabric patterns, everything. You could tell it wasn't from the store, and that's why I liked it. I moved away to college and kept thinking about this quilt. I wanted to take it to the park when I would go on picnics. Eventually I ended up just taking it from my parents house because I knew it was just sitting in the closet. I love this quilt. Then a couple of summers ago, Mammaw gave me a foot stool that doubled as a sewing box. She had it in the garage for a while, and thought that maybe I'd like it. Of course I did. I opened it up, and low and behold, there were some unused pieces from the quilt! They were already pieced together, you could tell it was just a portion that had been trimmed during the final construction. There were two full squares, one that I'll use for myself, and this one which I used for hers.


Now I can't wait to make an almost matching one for myself!
Friday, January 28, 2011
Needle Book
This is the next project for the kids' sewing class I teach. Simple, but now they'll be in charge of their own needles and have some to take home when they need to finish up their details.
Just two pieces of felt,

 Then fill the pages with needles, pins, and a needle threader.


 Simple enough!
Just two pieces of felt,

Fold in half and blanket stitch the spine, and add velcro as a closure.


Subscribe to:
Posts (Atom)