Showing posts with label book. Show all posts

Tuesday, May 3, 2011

I'm back!

After 2 weeks in Europe, a month of working myself ragged, and successfully pulling off my first Girl Scout Overnight at job #1, I am finally relaxed enough to blog again. Don't get me wrong, I've still been making stuff, I've just been falling into the old habit of half-documenting what I do. Meaning, I'll take pictures of a process, and completely forget to photograph the end results. Genius, I know.

Some of the half-documented things I found while uploading pictures were hand-made chocolate cups, filled with edible Easter grass and egg-shaped M&M's, made to look sort of like nests. I spent hours on those, and forgot to take pictures of anything but the chocolate bowls. Sheesh! I also made a custom baby book for a friend's future sister-in-law. I did it scrap book style, but re-covered the book with the fabric of her choice, and pre-layed out 25 pages so the new momma only has to worry about filling in the info about her babe.

Yesterday I really wanted to make something. I didn't know what, though. For some reason, every time I'm stumped, I pick up a paintbrush. I'm not a painter by any means, but that always seems to get my mind going. So, this is what I ended up doing:
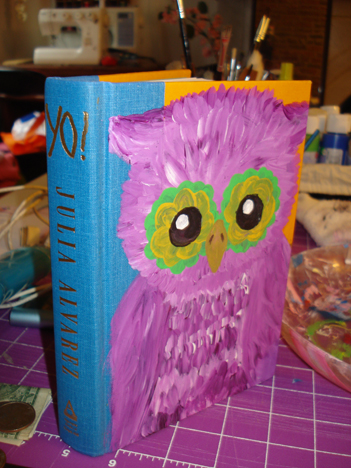
and this morning, I did this:


Painting on books is way more satisfying than I expected it to be. Now I just need to decide if I want to turn these into journals, or leave them as decorative books. I keep leaning toward journals, but then I stand them up and am pretty happy with how they look as is. What do you think?

Friday, February 4, 2011

Upcycled Book Journal

I finally found a tiny book to turn into a pocket sized journal. 50 cent project? Yes please! Here's how:

Gather all your supplies. Book, mod podge, pant brush, embroidery floss,  needles, ruler, scissors, awl, plain paper, printed paper, and self healing mat.

First you need to get rid of the pages in the book. This book was well loved, so they came out easily.

Mod Podge some pretty paper over the now ugly inside cover of the book.

Cut desired amount of paper into the correct size for your book.

Fold a few sheets of paper at a time in half to create your signatures. (Signatures are sectioned paper. I folded 4 sheets together to create 8 pages. If you folded 20 pieces at once, you'd have a wonky book!) Then use an awl to punch holes along the crease.

Make a template and use it on each of your signatures so the holes on each page are identical. This is important later. Once you've got all your signatures, sew them up!

Now you've got to sew all the signatures together. Basically, you just zig zag between the thread around your holes and pull it tight!

Punch holes in the spine of your book. I honestly just winged this part because I usually cut the spine off. The thought was to sew through the signatures again, snug against the sections I just did (the black part), and then sew through the spine. It worked, but the process was a little weird (and impossible to photograph) and I'll probably do it differently next time.

Ta-da! Finished book. There are a lot of pages in there!